Porcupine Arts and Crafts for Preschoolers Using Q-tips
This post may contain affiliate links, which means I’ll receive a commission if you purchase through my links, at no extra cost to you. Please read full disclosure for more information.

My daughter has been fascinated with porcupines lately, and I’ve wanted to find ways to incorporate them into our play. I always like checking out books from the library or doing crafts about her favorite fascinations. This time I decided to start with a porcupine arts and crafts idea.
This simple craft is a great preschool porcupine craft as well and a fun way for kids to learn about porcupines and their spiky bodies. And, it works on fine motor skills with having to glue small items in a row.
Porcupine Facts
In researching porcupines further for this project, I came across some fun facts about porcupines.
Did you know that porcupines are actually rodents? They’re just a very spiky type. There are also two broad types of porcupines: New World porcupines and Old World porcupines. Also, average porcupines can grow to 2-3 feet long and weigh up to 35 pounds. Who knew?
Arts and Crafts Inspiration
I know my daughter has never seen a live porcupine before, and I can’t remember if I’ve ever seen one at the zoo in the past. Nonetheless, somehow my daughter discovered what a porcupine is. So we’ve been fixated it on this week.
My daughter is also an incredible craft lover like me. She spends countless hours just creating things out of random supplies I put on her craft table every day. Her creativity is endless, and I’m a little envious.
She has a supply of Q-tips that we usually use to paint with, but every once in a while she will use them to dab glue or other things. These Q-tips were perfect for the porcupine craft! What better way to make spikes?
Craft Supplies You Will Need
- Lots of Q-tips
- Glue
- Permanent marker or other writing utensil
- Scissors
- Construction paper for porcupine and background
Make Your Own Porcupine Craft
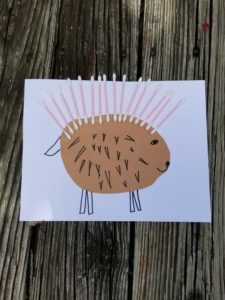
Making a porcupine yourself is a very simple task. All you first have to do is make and cut a body out of construction paper. We had brown construction paper around the house at the time, so that’s the color of our porcupine. I drew some facial features, a tail, and wedge-shaped spikes on in permanent marker as well. I’m a crafter, not an artist, so my porcupine isn’t a work of art. I also learned that porcupines have tails during this adventure!
I then glued the porcupine body onto a white piece of paper. If you’re particularly creative, you can glue your porcupine on a sheet of paper where you’ve drawn a porcupine habitat.
Then, you’ll want to glue on the Q-tips on the top of the porcupine. This can be done a number of ways. I preferred to just do a line of glue on the top of the porcupine and then place each individual Q-tip on the porcupine. My daughter had to dab each Q-tip all into the glue and place it on herself. It was very messy, but a very fun process for her. She also put probably 50 Q-tips on her porcupine’s back, which made for some very dense spikes!
We lastly let the crafts dry before we were able to hang them on our art wall. Overall, my daughter enjoyed the craft, and we both learned a little bit more about porcupines that we didn’t know before.
I’m not sure if I can think of any more porcupine arts and crafts ideas, but I’m trying just in case she continues on with this porcupine fascination! Let me know what you think!

